Keep Supplies Off the Floor
Storing cleaning supplies off the floor is not only practical but also essential for maintaining safety, organization, and cleanliness in your home. Leaving supplies on the ground can create clutter, pose safety risks for children and pets, and make it harder to keep the area clean and tidy. Below are some effective ways to ensure your cleaning supplies are stored off the floor while maximizing both convenience and safety.
Benefits of Keeping Supplies Off the Floor
- Enhanced Safety: Cleaning products can pose hazards if spilled or accessed by children or pets. Elevating storage reduces these risks.
- Improved Organization: Supplies stored properly are easier to locate and use.
- Easier Cleaning: Keeping floors clear ensures you can vacuum or mop without obstructions.
- Pest Prevention: Floor storage may attract pests like ants or roaches, particularly if products leak or spill.
Storage Options to Elevate Cleaning Supplies
- Install floating shelves in a laundry room, utility space, or garage.
- Opt for durable materials like metal or treated wood that can support heavier items like detergent containers.
- Use an over-the-door rack with pockets to hold spray bottles, sponges, gloves, or smaller cleaning tools.
- These are particularly useful in compact spaces where floor space is limited.
- A pegboard mounted on a wall allows you to hang items like dusters, mops, and spray bottles.
- Use hooks and baskets for adjustable storage options.
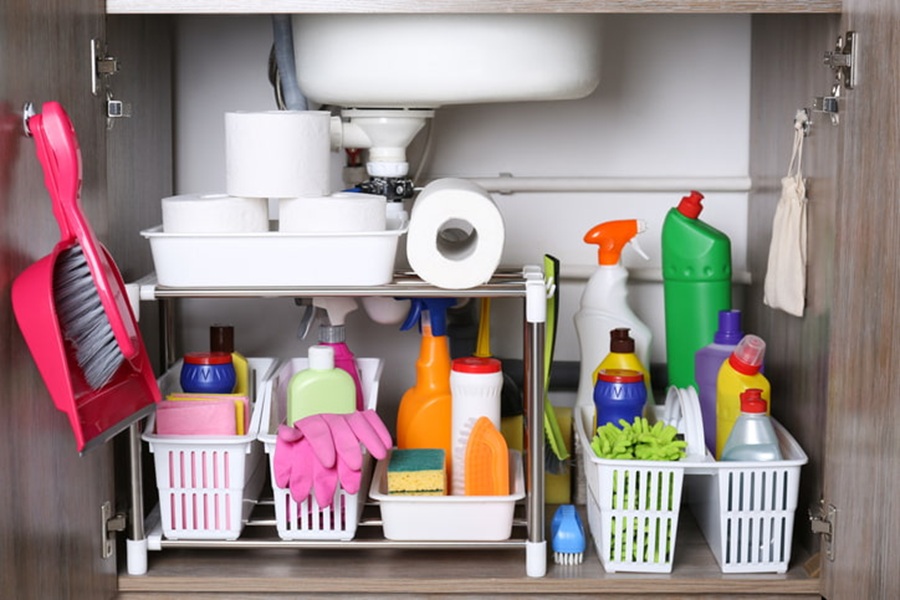
- Add stackable cabinet organizers inside existing cabinets to double your storage space.
- This works well under sinks or within a designated cabinet used exclusively for cleaning products.
- A rolling cart with multiple tiers can keep supplies elevated while allowing easy mobility from room to room.
- Choose carts with brakes for added stability during storage.
Safety Considerations
When storing supplies off the floor: – Ensure that toxic materials are out of reach of children by placing them on higher shelves or behind locked cabinets. – Always secure heavier items on lower shelves of wall-mounted units to prevent tipping hazards.
Example Table: Storage Options Comparison
| Option | Pros | Ideal For |
| Wall-Mounted Shelves | Saves space; versatile | Laundry rooms, garages |
| Over-the-Door Racks | Budget-friendly; compact | Bathrooms or small spaces |
| Pegboards | Customizable; good visibility | Utility rooms |
| Cabinet Shelves | Fits inside existing furniture | Kitchens |
| Rolling Carts | Portable; versatile | Multi-room use |
By implementing these strategies, you can maintain an organized home while ensuring that cleaning products remain safely stored above ground level.
Use a Separate Closet
Designating a specific closet for cleaning supplies is an excellent way to keep your home organized, safe, and accessible. A dedicated space ensures that all tools and products are stored in one central location, reducing clutter and making it easier to find what you need when tackling household chores. Below are practical considerations and tips on how to maximize the use of a separate closet for cleaning supplies.
Benefits of Using a Separate Closet
- Safety:Keeping cleaning products in a single, enclosed area reduces the likelihood of accidents involving children or pets. You can easily add childproof locks or latches for extra security.
- Organization:A designated closet encourages systematic storage, so you’ll always know where to find or return items.
- Convenience:Placing all cleaning tools in one location saves time—you won’t have to search multiple spaces throughout your home.
Choosing the Right Closet
Not every closet is ideal for storing cleaning supplies.
- Proximity:Choose a closet that’s near frequently cleaned areas like the kitchen or main living spaces.
- Size:Ensure the space is large enough to store items such as mops, brooms, vacuums, and bottles of cleaners without overcrowding.
- Ventilation:Proper ventilation prevents fumes from concentrated chemicals from building up within an enclosed area.
- Accessibility:Ensure shelves are within easy reach but high enough to keep hazardous products out of reach of children and pets.
Organizing Your Closet Space
- Install Adjustable Shelving: Adjustable shelves allow you to customize storage based on the height of different bottles, containers, or tools.
- Use Hooks and Racks: Attach hooks on the inside door or walls for hanging lightweight items like dusters, scrub brushes, or gloves.
- Add Clear Bins: Group similar products (e. g. , bathroom cleaners or floor care products) in labeled clear bins for visibility and order.
| Item | Suggested Storage Solution |
| Spray bottles | Store upright on adjustable shelves |
| Mops & brooms | Wall-mounted hooks/holders |
| Sponges/cloths | Clear labeled bins |
| Vacuum cleaner | Floor-level storage |
Maintenance Tips
- Perform regular decluttering by discarding expired products or those that are no longer useful.
- Wipe down shelves periodically if there’s any spillage from liquid cleaners.
- Reorganize seasonally as your needs change—summer might call for outdoor patio cleaners while winter may shift focus toward deicing solutions.
By dedicating a specific closet exclusively for all cleaning-related materials, you’ll create an efficient system that saves time during household tasks while keeping potentially hazardous chemicals safely contained.
Utilize the Garage
The garage can be an excellent place to store cleaning supplies, especially for bulky or infrequently used items. With its open space and ability to house large storage setups, a well-organized garage can help keep your home clutter-free while ensuring cleaning essentials remain accessible when you need them. Here are some practical tips and considerations for using your garage as a storage area for cleaning supplies.
Benefits of Using the Garage
- Ample Storage Space: Garages usually offer more space than closets or cabinets, making them ideal for larger items like mops, brooms, buckets, and vacuum cleaners.
- Segregation from Living Areas: Storing cleaning products in the garage keeps potentially hazardous chemicals away from children and pets in indoor areas.
- Temperature Stability: While garages aren’t climate-controlled, many cleaning products can still be safely stored in this environment if they are not sensitive to heat or cold.
Best Practices for Organizing Cleaning Supplies in the Garage
- Use hooks or pegs to hang brooms, mops, and dusters vertically on the wall. This keeps them off the floor and avoids unnecessary clutter.
- Pegboards provide flexibility; you can add hooks and small shelves to hold spray bottles, scrub brushes, and gloves.
- Metal or heavy-duty plastic shelving is perfect for holding large items such as detergent bottles, bulk cleaning powders, and disinfectant sprays.
- Label shelves clearly by category (e. g. , “Floor Cleaning,” “Window Care,” “Outdoor Supplies”) so you can quickly locate what you need.
- Set aside one section of the garage exclusively for cleaning-related items. This helps maintain order by preventing them from mixing with tools or sports gear.
- Use stackable plastic bins with lids to store smaller supplies like sponges or microfiber cloths while protecting them from dust.
Safety Considerations
Storing certain cleaning products in a garage requires extra precautions to maintain safety: – Keep Away From Heat Sources: Store flammable products such as aerosol sprays or solvents away from water heaters or appliances that generate heat.Ensure Ventilation: Some chemicals emit strong odors; proper ventilation prevents fumes from accumulating in enclosed spaces.Secure Hazardous Items: Use locked cabinets to store dangerous chemicals like bleach if children have access to the area.
| Storage Task | Recommended Method | Example Items |
| Wall Organization | Pegboards/Hooks | Brooms, Mops |
| Bulk Item Storage | Heavy-duty Shelving | Large Detergents |
| Small Item Storage | Stackable Bins with Labels | Sponges, Gloves |
By utilizing these methods, you maximize available space while keeping your household safe. Organizing cleaning supplies in your garage not only enhances functionality but also ensures these essentials remain easy to access whenever needed.
Avoid Rooms With High Humidity
Proper storage of cleaning supplies not only ensures safety but also maintains the effectiveness of the products. One crucial factor to consider when choosing where to store cleaning items is avoiding areas with high humidity. Excess moisture can compromise the quality, stability, and safety of many cleaning solutions. Below is an in-depth exploration of why this is important and how to address it.
Why Humidity Matters for Cleaning Supplies
- Degradation of Chemicals: Many liquid cleaning agents, such as detergents and disinfectants, can break down more quickly when exposed to moisture in the air. This reduces their effectiveness over time.
- Corrosion Risk: Containers made of metal or those with metal components (e. g. , spray bottle nozzles) are susceptible to rust in humid environments.
- Powder Caking: Dry, powdered products like laundry detergent or scouring powders can clump together when exposed to moisture, making them harder to use.
- Mold Growth: Unopened or improperly sealed supplies may develop mold in damp conditions, especially sponges, cloths, or mop heads stored nearby.
Spaces Prone to High Humidity
- Bathrooms: These rooms are subject to frequent steam from showers and baths. Storing cleaning products here could lead to quicker degradation of liquids or powders while increasing the risk of mold growth on other items nearby.
- Laundry Rooms Without Ventilation: While this space may seem logical for certain supplies like laundry detergent, poor ventilation can cause humidity levels to rise from dryer exhaust or damp clothing. Consider ventilation solutions if you must use this area for storage.
- Basements Without Dehumidifiers: Basements often have higher levels of natural humidity due to their location below ground level.
Ideal Alternatives for Storage
- Store items in climate-controlled spaces such as hallways, closets outside damp zones, or kitchen cabinets away from sinks.
- Avoid storing near water heaters or plumbing fixtures that may leak.
- For powdered products like baking soda-based cleaners or washing powder, transfer them into airtight plastic containers that prevent exposure to ambient air.
- Similarly, invest in resealable storage bins for sponges and rags.
- If you must store items in a naturally humid space like a basement or utility room, consider installing a dehumidifier to reduce overall moisture levels.
- Use plastic shelving units instead of metal ones since these resist corrosion better when exposed to any residual moisture.
Quick Reference Table
| Problem | Cause | Solution |
| Chemical degradation | High humidity | Store in sealed containers |
| Clumped powders | Moisture exposure | Use airtight bins |
| Corrosion on packaging | Metal exposure | Opt for non-metal storage options |
Avoiding high-humidity spaces ensures that your cleaning supplies remain effective and safe for use over time while preventing unnecessary waste due to degradation issues commonly caused by improper storage conditions. Taking proactive measures will help maintain both product performance and household safety effectively without compromising convenience.
Avoid Rooms With High Humidity
Storing cleaning supplies in rooms with high humidity can lead to several issues, such as product degradation, rust on metal components, or even safety hazards from leakage. Proper storage not only extends the life of your cleaning products but also ensures they remain effective and safe to use. Let’s explore why avoiding humid areas is important and where you might store your supplies instead.
Why Avoid Humid Rooms?
Humidity can impact cleaning supplies in several ways:
– Chemical Breakdown: High moisture levels can cause chemical cleaners to degrade more quickly, reducing their effectiveness over time.
– Container Compromise: Excess humidity may weaken plastic or cardboard containers, potentially leading to leaks or spills.
– Rust Formation: Items like metal scrub brushes, scrapers, or aerosol cans are prone to rust in damp environments. Rust not only damages the item but could also stain surfaces where these items are stored.
– Mold and Mildew Growth: Moisture encourages mold and mildew growth on sponges, cloths, and other porous materials, creating unhygienic conditions.
Common Humid Areas To Avoid
When organizing your home for cleaning supply storage, steer clear of these spaces:
– Bathrooms: Bathrooms are often humid due to daily showers or baths. Even with ventilation systems in place, this is not an ideal storage area for most products.
– Laundry Rooms Without Ventilation: While a laundry room may seem like a logical space for cleaning supplies, poor ventilation can lead to higher humidity levels that negatively affect certain items.
– Basements Without Dehumidifiers: Basements tend to trap moisture unless equipped with proper dehumidification systems.
Ideal Storage Alternatives
| Location | Benefits | Tips for Use |
| Kitchen Cabinets | Dry environment; accessible location | Use labeled bins for grouping products |
| Hallway Closets | Away from water sources | Install shelves for vertical storage |
| Utility Rooms | Typically well-ventilated | Add hooks for hanging tools |
Practical Tips for Humidity Management
If you don’t have an option but to store some items in rooms prone to humidity (e. g. , small apartments), here’s how you can mitigate potential issues: – Use airtight containers or zippered plastic bags to protect products from moisture exposure. – Add silica gel packets or small dehumidifiers inside the storage area. – Store metal items like spray nozzles and scrubbers in sealed bags when not in use. – Choose stackable plastic bins that keep products elevated off potentially damp surfaces.
By taking steps to avoid high-humidity areas and managing moisture levels effectively when needed, you’ll ensure your cleaning supplies stay functional and safe while maintaining an organized home environment.
Designate a Cabinet
Designating a specific cabinet for your cleaning supplies is an excellent way to stay organized, save time, and ensure safety. By consolidating all your items in a single, well-chosen space, you’ll streamline your cleaning routine while keeping potentially harmful products out of reach of children and pets.
Choosing the Right Cabinet
- Pick a spot that’s easily accessible but not in the way. For instance, cabinets near frequently cleaned areas like the kitchen or laundry room make sense.
- Avoid placing the cabinet too far from where you typically use cleaning supplies to reduce unnecessary trips back and forth.
- Ensure the cabinet is large enough to hold all your essential items but not so spacious that it encourages clutter.
- A tall cabinet with adjustable shelves offers flexibility for storing items of various sizes, from spray bottles to bulkier items like mop solutions.
- Choose a cabinet that isn’t airtight to allow airflow. This helps prevent buildup of chemical fumes from concentrated cleaners.
Organizing Your Cabinet
Once you’ve chosen the ideal cabinet, organize it thoughtfully to maximize efficiency.
- Categorize Supplies
Group similar products together so they’re easy to locate:- All-purpose cleaners
- Floor care products (mop solutions, polishes)
- Glass/window sprays
- Bathroom-specific supplies
- Specialty products (stain removers, upholstery cleaners)
- Use Storage Bins or Caddies
Break up the space within the cabinet using clear or labeled bins:- Keep smaller items (sponges, scrub brushes) in one bin.
- Use another bin for extra refillable containers or backup products.
- Place Frequently Used Items at Eye LevelStore everyday essentials like multi-surface sprays and paper towels in easily accessible spots within the cabinet.
- Utilize Door SpaceInstall hooks or racks on the inside of the cabinet door for smaller tools such as gloves, microfiber cloths, or dusters.
Safety Considerations
Cleaning chemicals can pose risks if improperly stored.
- Store hazardous materials out of reach of children and pets—preferably in higher cabinets with childproof locks.
- Keep flammable substances away from heat sources.
- Avoid mixing certain chemicals (e. g. , bleach and ammonia) by keeping them stored separately.
| Product Type | Ideal Placement | Notes |
| Everyday Cleaners | Eye level | For quick and frequent use |
| Hazardous Chemicals | Higher shelf with child lock | Protects children and pets |
| Heavy/Bulk Items | Lower shelf | Prevents strain when lifting |
| Small Tools/Accessories | Hooks on door or small bins | Maximizes space |
By dedicating one well-thought-out cabinet for your supplies and setting it up strategically, you’ll ensure that everything has its place—making household upkeep more efficient and stress-free.
Designate a Cabinet
Designating a cabinet for your cleaning supplies is one of the most practical and efficient ways to keep them organized and easily accessible. A dedicated cabinet not only helps to create order but also ensures safety, particularly if you have children or pets in your home. By assigning a specific space for these items, you’ll avoid having them scattered throughout the house, making your cleaning routine more streamlined.
Choosing the Right Cabinet
When selecting a cabinet for your cleaning supplies, consider the following factors:
– Location: Choose a cabinet located in an area where it is easy to access during your regular cleaning tasks. For instance, a kitchen or laundry room cabinet can be ideal due to their central location in most homes.
– Size: Ensure the cabinet is large enough to accommodate all of your essential cleaning products, tools, and any refills. Overcrowding can make it difficult to find what you need when you need it.
– Ventilation: Some cleaning products may emit fumes over time. A well-ventilated cabinet or one with proper airflow will help prevent any buildup of odors or chemicals. Avoid completely airtight spaces unless necessary for safety concerns.
Organizing Your Cabinet
- Install Adjustable Shelves: Adjustable shelves allow flexibility in storing different-sized supplies like spray bottles, sponges, and larger items such as mops or cleaning buckets.
- Use Storage Bins: Group similar items together (e. g. , glass cleaners, disinfectants) into labeled storage bins or baskets. This makes locating specific products quicker while maintaining organization.
- Add hooks inside the cabinet door for lightweight tools like dusters or small brushes.
- Install tension rods across the width of the cabinet to hold spray bottles by their nozzles.
- Prioritize Access: Place frequently used items at eye level or within easy reach while storing less-used products on higher or lower shelves.
- Childproofing Measures: If there are children in your home, install childproof locks on the cabinet doors to prevent accidental access.
Maintaining Your Designated Cabinet
Regularly maintaining your designated cleaning supply cabinet ensures that it remains functional over time: – Conduct periodic checks every month to remove empty containers and expired products. – Wipe down shelves with a damp cloth when spills occur to prevent residue buildup. – Rotate stock when purchasing new supplies; place older items toward the front so they are used first.
By designating and properly organizing a specific cabinet for your cleaning supplies, you’ll save time during household chores while ensuring safety and efficiency in managing these essential tools.