Why Cheese Graters Are Hard to Clean
Cheese graters are indispensable tools in the kitchen, but their very design makes them notoriously tricky to clean. From their sharp edges to the intricate holes, several factors contribute to why cleaning a cheese grater can feel like a challenging task. Understanding these difficulties can help you develop better cleaning strategies and keep your grater in excellent condition.
Design Challenges
- Sharp Edges: The blades of a cheese grater are intentionally sharp, making it easy to shred cheese but difficult and potentially dangerous to clean using bare hands or improper tools.
- Narrow Grooves: The small grooves and holes trap bits of food, especially soft or sticky ingredients like cheese, which can harden if left unattended.
- Multiple Sides: Box graters with multiple surfaces or rotary graters with internal mechanisms have more areas where food particles can get lodged, requiring extra care during cleaning.
Types of Foods That Make Cleaning Difficult
| Food Type | Reason for Sticking |
| Soft Cheeses | High moisture content causes smearing |
| Hard Cheeses | Fine shreds cling tightly |
| Vegetables (e.g., carrots) | Fibrous bits get stuck in grooves |
Common Mistakes That Make Cleaning Harder
It’s not just the design; sometimes, cleaning struggles arise from how we handle the grater after use:
– Letting Residue Dry: Waiting too long to clean allows food particles to harden, making them much harder to remove.
– Using the Wrong Tools: Items such as regular sponges may be too bulky or ineffective at reaching small crevices. Overly abrasive materials may damage the surface.
– Improper Rinsing Techniques: Rinsing incorrectly—such as under low water pressure—may leave behind residue that becomes harder to scrub later.
Importance of Cleaning Properly
Leaving a grater dirty doesn’t just lead to inconvenience during your next use; it poses hygiene risks too:
1. Bacteria growth is encouraged when food particles remain stuck in the grater’s narrow slots. 2. Residue buildup over time can affect the taste and texture of freshly grated ingredients. 3. Improperly cleaned metal graters may rust, reducing their durability.
Taking note of these challenges sets you up for success when tackling this task effectively. By understanding why cleaning requires special attention, you’ll be better equipped when moving on to practical techniques for maintaining your cheese grater’s cleanliness and functionality at every use.
Step-by-Step Guide to Cleaning a Cheese Grater
Cleaning a cheese grater may seem like an intimidating task, especially when bits of cheese cling stubbornly to its sharp surfaces. However, by following a step-by-step approach and using the right techniques, you can clean your grater efficiently without damaging it—or your hands. Below is a simple guide designed to make the process straightforward and hassle-free.
1. Gather Your Supplies
- Warm soapy water (a mix of dish soap and hot water)
- A soft-bristled brush or old toothbrush
- A sponge (preferably non-abrasive)
- Rubber gloves for grip and safety
- Optional: A wooden skewer or toothpick for stubborn debris
2. Rinse Immediately After Use
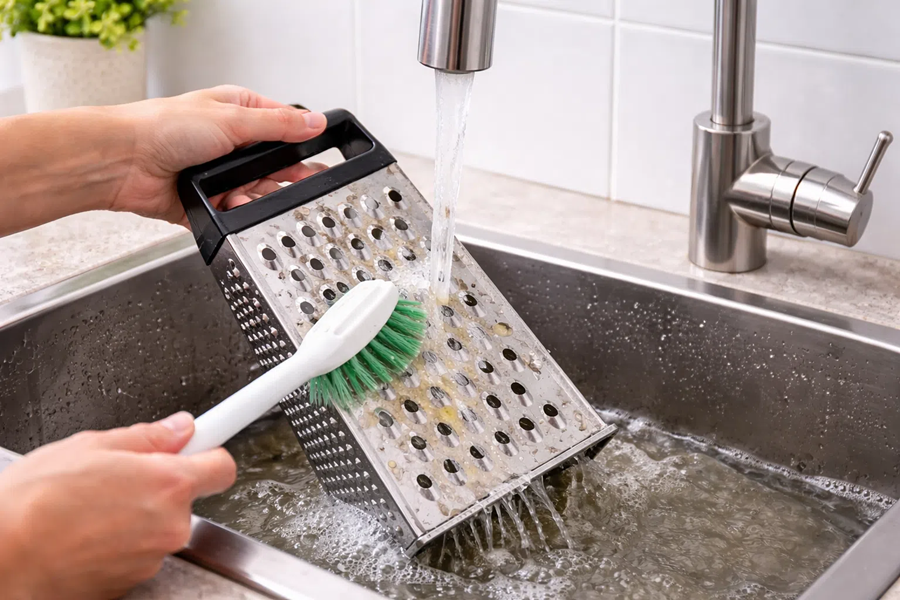
- Rinse under hot water: Immediately after grating, rinse the grater thoroughly under warm running water. This will help wash away soft cheese bits before they cling or dry out.
- Angle your grater: Hold the grater at an angle to ensure all sides are exposed to the running water, especially in narrow openings.
Pro Tip: Avoid letting grated cheese sit on the tool; dried-on cheese is much harder to remove.
3. Choose an Effective Scrubbing Method
For Light Residue:
- Use a sponge dipped in soapy water.
- Gently wipe along the grain of the blade (the direction in which you grate), not against it—this avoids dulling edges while protecting your hands.
- Rinse thoroughly with warm water.
For Stubborn Particles:
- Dip a soft-bristled brush or old toothbrush into soapy water.
- Scrub both sides of the grating surface gently but firmly until all residue is gone.
For Hard-to-Reach Areas:
Use tools like toothpicks or wooden skewers to dislodge stuck-on bits from corners or holes.
4. Tackle Dried-On Cheese
- Soak in Hot Soapy Water
Fill a basin with hot water mixed with dish soap and immerse your cheese grater for about 10–15 minutes. This loosens hardened residue without excessive scrubbing. - Scrub Gently
After soaking, use your brush or sponge to clean off softened debris. - Avoid Abrasive Materials
Never use steel wool or harsh scouring pads that could scratch stainless steel graters or damage coated ones.
Pro Tip: Lemon juice can be used as a natural degreaser for oilier cheeses like Parmesan.
5. Sanitize Your Grater
- Create a solution of one part white vinegar to three parts warm water.
- Wipe down your clean grater using this mixture.
- Rinse thoroughly and dry immediately.
This step is especially useful if you’re cleaning after working with multiple types of cheeses that might leave lingering odors behind.
By following this step-by-step guide systematically, you’ll keep your cheese graters spotless without unnecessary frustration or wasted time while maintaining their longevity as essential kitchen tools.
Removing Stuck-On Cheese Safely
Cheese graters, by design, have tiny, sharp grating surfaces that tend to trap bits of cheese, especially soft or sticky varieties like mozzarella or cheddar. Removing this residue without damaging the grater or injuring yourself requires care. This section will guide you through safe and effective methods to clean your grater without hassle.
Start Soaking Immediately
- To make cleaning easier, start the process as soon as possible after using the grater. If cheese dries and hardens on the surface, it becomes much harder to remove.
- Fill a sink or bowl with warm water and a small amount of dish soap. Submerge the grater completely to loosen stuck-on cheese particles.
Use the Right Cleaning Tools
The tools you use are crucial for removing debris safely and effectively: – Soft-bristled brush: A nylon dish brush works well for scrubbing without dulling the blades. – Toothbrush: Ideal for reaching into small holes or crevices on fine graters. – Silicone spatula or scraper: Perfect for scraping off softened cheese without harming your hands or scratching surfaces. – Microfiber cloth: Gentle enough to clean flat graters while preventing scratches.
Cleaning Process Overview
- Rinse Immediately: After use, rinse both sides of your cheese grater under warm running water while gently scrubbing with a brush. This step prevents cheese from hardening.
- Soften Hardened Residue: For dried-on cheese, soak the grater in soapy water for 10–15 minutes until softened.
- Scrub Gently: Using a soft-bristled brush or toothbrush, scrub along both sides of the blades in a back-and-forth motion to dislodge stuck bits.
- Check Tiny Holes: Inspect any fine holes on rotary or microplane graters and use a toothbrush to carefully clean these areas.
Avoid Common Mistakes
To ensure safety and protect your grater: – Never use steel wool or abrasive scrub pads as they can damage the sharp edges and shorten your tool’s lifespan. – Avoid applying too much pressure when scrubbing; gentle motions are sufficient when combined with soaking. – Be cautious of sharp edges when handling—move brushes away from your hand rather than toward it.
Eco-Friendly Tip
If you prefer an alternative to traditional cleaning tools, reusable bamboo sticks (such as skewers) can help dislodge stubborn bits from tight spaces in rotary graters without creating waste.
| Cleaning Tool | Best Use | Caution |
| Soft-bristled brush | General surface cleaning | Avoid pressing too hard near sharp edges |
| Toothbrush | Small holes & crevices | Ensure bristles are firm but not abrasive |
| Silicone scraper | Loosening residue | Do not scrape too aggressively |
| Bamboo stick/skewer | Rotary grater slots | Use carefully around sharp corners |
By combining these techniques with proper tools and soaking practices, you can safely remove even stubborn cheese residue while keeping your hands protected and your grater ready for future use. Safe cleaning ensures that your tool stays functional over time while maintaining its efficiency for all types of grated ingredients.
Tips to Prevent Buildup After Use
A cheese grater is an essential kitchen tool, but it can be frustrating if residue builds up over time. By following a few simple tips and cleaning practices after each use, you can prevent cheese and other food particles from hardening on the surface. This not only makes your grater easier to clean but also keeps it hygienic and in good condition for longer.
Clean Immediately After Use
One of the most effective ways to prevent buildup is to clean your cheese grater immediately after you’re done using it. Cheese, especially soft varieties, dries quickly and becomes difficult to remove when hardened. To avoid this issue: – Rinse the grater under warm running water as soon as possible. – Use a brush or sponge to remove any remaining bits before they dry. – Avoid letting the grater sit with cheese on it — even a short delay can make cleanup more challenging.
Use a Food Brush or Scrubber
Certain tools make cleaning easier and help prevent residue from accumulating in the first place: – Silicone food brushes: These are excellent for loosening stubborn bits of cheese from small holes without scratching. – Dish scrubbers or sponges: Opt for non-abrasive scrubbers that won’t damage the surface of your grater. – Toothbrushes: An old toothbrush can work well for box graters or rotary graters with hard-to-reach areas.
Keep one of these tools handy near your sink so you can quickly address stuck-on particles as part of your cleaning routine.
Grate with Care
Preventing buildup also starts with how you use your cheese grater. Consider these best practices while grating: – Chill soft cheeses before grating; cold cheese is less likely to smear and stick. – Apply light pressure rather than pressing forcefully, which can mash food into the holes of the grater. – If using harder cheeses like Parmesan, avoid letting grated bits collect between uses—tap them off periodically.
Pre-Treat Before Cleaning
If you’re unable to clean the grater immediately after use, soaking it briefly is an excellent way to loosen stuck-on debris: 1. Fill a shallow dish or sink with warm water and add a small amount of dish soap. 2. Place the grater in the solution for 5–10 minutes (no longer, as some metals may rust over time if left submerged). 3. Proceed with scrubbing using one of the tools mentioned above.
Preventative Measures During Use
To minimize difficult cleanup efforts altogether, consider these tips during use: – Spray cooking oil: Lightly spraying non-stick cooking oil on both sides of your grater before use can reduce sticking. – Rub with olive oil: For particularly sticky foods like soft cheeses, rub a tiny bit of olive oil on the surface beforehand—it creates a slick layer that prevents food particles from clinging.
| Cheese Type | Suggested Action |
| Soft Cheese (e.g., Mozzarella) | Chill before use; apply light pressure when shredding |
| Hard Cheese (e.g., Parmesan) | Tap off excess regularly; avoid letting residue settle |
Store in a Clean State
After every use and cleaning session, ensure that no food remnants remain on your cheese grater: – Inspect all sides carefully—particularly hidden corners or crevices common in box graters or rotary models. – Dry thoroughly after washing (refer to drying methods mentioned elsewhere) since moisture encourages rusting and sticks debris onto surfaces again over time.
By incorporating these tips into your regular kitchen habits, you’ll save yourself time scrubbing later while maintaining an efficient and sanitary tool for all your cooking needs.
Tips to Prevent Buildup After Use
Keeping your cheese grater clean and free of buildup after each use not only makes it more hygienic but also extends its lifespan. Preventing cheese and other food residues from hardening on your grater can save time and effort during cleaning. Below are practical strategies to ensure your grater remains in top shape after every use.
Rinse Immediately After Use
- Act Quickly: As soon as you’re done grating, rinse the grater under warm running water. Fresh cheese residue is much easier to remove before it has a chance to dry and harden.
- Angle the Grater: Hold the grater at a slight angle while rinsing, allowing water to flow through its holes and dislodge any stuck bits of cheese.
Use a Brush for Thorough Cleaning
- Keep a soft-bristled brush or an old toothbrush nearby to quickly scrub away debris. Focus on both sides of the blades, as residues can cling to the reverse side as well.
- Avoid using metal brushes, as these can damage the surface of your grater over time.
Apply Cooking Spray Before Use
A light coating of non-stick cooking spray applied before using your grater can prevent cheese from sticking in the first place. This technique works especially well for soft cheeses like mozzarella or brie.
Grate with Care
- Opt for cooler cheese: Soft cheeses, when grated at room temperature, tend to stick more than firm or chilled varieties. Refrigerating softer cheeses for 15–20 minutes before use can minimize residue buildup.
- Use short strokes: Instead of long swipes that press cheese deep into the holes, use shorter, gentler movements to reduce friction and sticking.
Pre-Clean with Bread or Vegetables
After using the grater, consider rubbing a piece of stale bread or a firm vegetable (like a carrot) over its surface. This helps push out any leftover fragments stuck in the tiny crevices.
Avoid Soaking Too Long
While soaking may seem like an easy cleaning solution, prolonged exposure to water—especially if left overnight—can cause food particles to adhere even more firmly once dried. It may also lead to rusting in non-stainless steel graters.
Quick Maintenance Tips Table
| Problem | Solution |
| Soft cheese clumping | Chill cheese before use |
| Hard-to-reach food bits | Use an old toothbrush |
| Rust concerns | Dry thoroughly immediately after wash |
By incorporating these preventive measures into your routine, you’ll streamline the cleaning process and prolong your cheese grater’s functionality. Developing these habits will save you both time and hassle down the line while ensuring optimal performance from this essential kitchen tool.
Proper Drying and Storage to Avoid Rust
Ensuring your cheese grater is properly dried and stored is a critical step in maintaining its longevity, preventing rust, and avoiding contamination of your food. Cheese graters, particularly those made of metal, are prone to corrosion if left damp or stored in unsuitable conditions. Below are some actionable tips for drying and storing your grater correctly.
Why Proper Drying Matters
- Rust Prevention: Moisture left on the surface of a grater can lead to rust spots over time. Rust not only damages the tool but can also pose health risks if transferred to food.
- Hygiene: A poorly dried grater may harbor bacteria or mold, especially if bits of cheese remain trapped in the blades or grooves.
- Durability: Regular attention to drying ensures that your grater stays sharp and functional for longer, saving you money on replacements.
Steps for Proper Drying
- Rinse Thoroughly: After cleaning the grater (whether by handwashing or using a dishwasher), ensure there’s no cheese residue left behind as these remnants can hold moisture.
- Shake Off Excess Water: Hold the grater firmly and shake it gently to remove as much water as possible before proceeding with drying.
- Wipe down both sides of the metal surface carefully with an absorbent kitchen towel.
- Pay special attention to any crevices or hard-to-reach areas where water might linger.
- Place the grater upright on a dish rack or lay it flat on a clean dry surface with plenty of airflow.
- If possible, leave it out overnight to ensure every part is completely dry before storing.
Best Storage Practices
Once your cheese grater is thoroughly dried, you’ll need to store it properly to maintain its condition and prevent exposure to moisture or contaminants.
- Avoid Humid Areas:
Store your cheese grater in a cool, dry place such as an enclosed cabinet rather than near the sink or stove where humidity levels may be higher. - Use Protective Covers (if available):
Some graters come with protective cases or covers designed to shield their blades from damage while also keeping dust away during storage. - Keep It Accessible Yet Safe:
Consider hanging box graters by their handles on hooks in your pantry or wall-mounted organizers, ensuring they stay upright and properly ventilated. Rotary graters can be stored disassembled in a drawer lined with dividers for added protection from scratches.
| Type of Grater | Best Storage Method | Notes |
| Box Graters | Hang vertically or store upright | Protect sharp blades carefully |
| Flat Graters | Slide into utensil holders | Ensure adequate airflow |
| Rotary Graters | Disassemble & store in compartments | Keep small parts together |
Tips for Long-Term Care
- Apply a small amount of food-grade mineral oil periodically onto metal surfaces using a soft cloth; this creates an additional barrier against moisture.
- Avoid stacking heavy items on top of flat graters during storage as this could warp their shape.
- For wooden-handled graters (if applicable), condition the handle occasionally with wood-safe oils like linseed oil to prevent cracking due to dryness.
By following these steps consistently, you’ll keep your cheese grater in pristine condition while preventing rust and other issues that could shorten its lifespan.
Proper Drying and Storage to Avoid Rust
Drying and storing a cheese grater properly is essential for maintaining its longevity, ensuring hygiene, and preventing rust formation. Since most graters are made from stainless steel or metal alloys, moisture can lead to corrosion if not handled carefully. This section outlines best practices for drying and storing your cheese grater effectively.
Why Proper Drying Is Crucial
Even though many graters are constructed from rust-resistant materials, they are not completely immune to rust if exposed to prolonged moisture. Residual water can settle in crevices or along the edges of the blades, creating an environment conducive to corrosion. Over time, this can compromise the functionality of the grater and lead to unsanitary conditions.
Effective Methods for Drying Your Cheese Grater
- After washing your grater, use a clean, dry microfiber cloth or kitchen towel to wipe away all visible water droplets. Pay special attention to corners, grooves, holes, and sharp edges where water may accumulate.
- For box graters or rotary models with multiple surfaces, unfold the towel and use one corner of it to insert into hard-to-reach spots.
- Place your cheese grater in an upright position on a drying rack so that water naturally drips away from it.
- Ensure there’s ample airflow around it by avoiding cluttered dish racks. You want each surface of the grater exposed fully to air circulation.
- If possible, place it near sunlight or under a fan for faster drying.
- For quicker results, you can briefly warm your oven on low heat (around 150°F/65°C), turn it off, and place the cleaned grater inside for about 10 minutes. The residual heat will evaporate any lingering moisture without risking damage.
Steps for Safe Storage
- Store in Low-Humidity Areas
Keep your cheese grater in a cool and dry place. Avoid cabinets near sinks or dishwashers where humidity levels tend to be higher. - Use Protective Covers (if available)
Some graters come with protective covers for their sharp edges or rotary drums. If yours has one included in the packaging, store the grater inside its cover when not in use to protect both its surface and surrounding utensils. - Place Separately from Wet Utensils
Avoid placing your cheese grater next to damp cutting boards or cookware that could transfer moisture during storage. - Hang It (for Box Graters)
Many box graters come with hanging loops at the top handle; consider hanging them on hooks where they’ll get ample airflow compared to being crammed inside drawers.
Preventive Measures
To further prevent rust over time: – Lightly rub vegetable oil over metal surfaces after full drying (optional). This creates a thin protective barrier against moisture. – Check for signs of rust periodically; if any small spots appear despite precautions, use baking soda combined with water as a gentle scrub solution before drying again thoroughly. – Avoid leaving graters submerged in water during cleaning—a quick rinse followed by immediate drying is better than soaking.
| Drying Do’s | Drying Don’ts |
| Use a microfiber cloth | Leave wet overnight |
| Air-dry upright | Store near sinks |
| Warm oven trick (low heat) | Submerge unnecessarily |
By incorporating these simple yet effective habits into your cleaning routine after every use, you’ll maximize the durability of your cheese grater while keeping it hygienic and functional over time.